Straw Reed Instrument
Summer
2017
Feature
Straw Reed Instrument
This experiment uses inexpensive materials to teach grades 6-12 and the general public about acoustics and the physics of sound. It is ideal for many different-sized groups and limited budgets. Explanations can be adapted based on the education background of the audience.
MATERIALS:
Scissors and plastic soda straws (two per participant recommended).
INSTRUCTIONS:
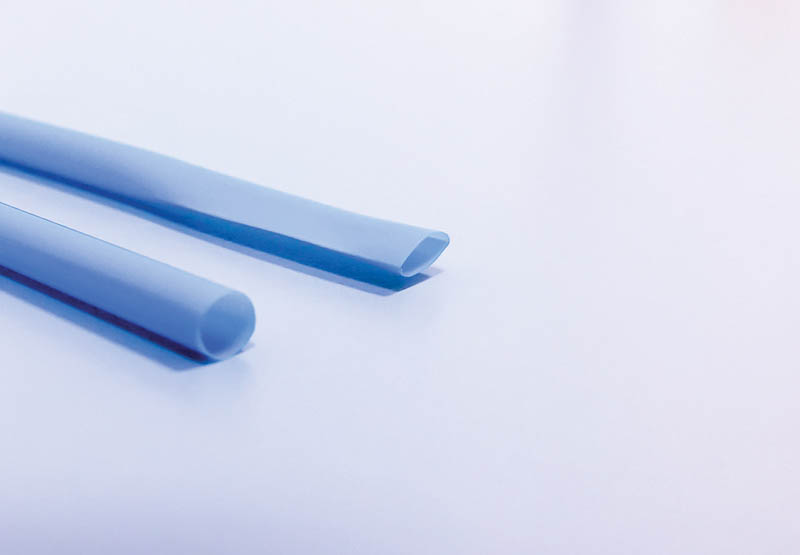
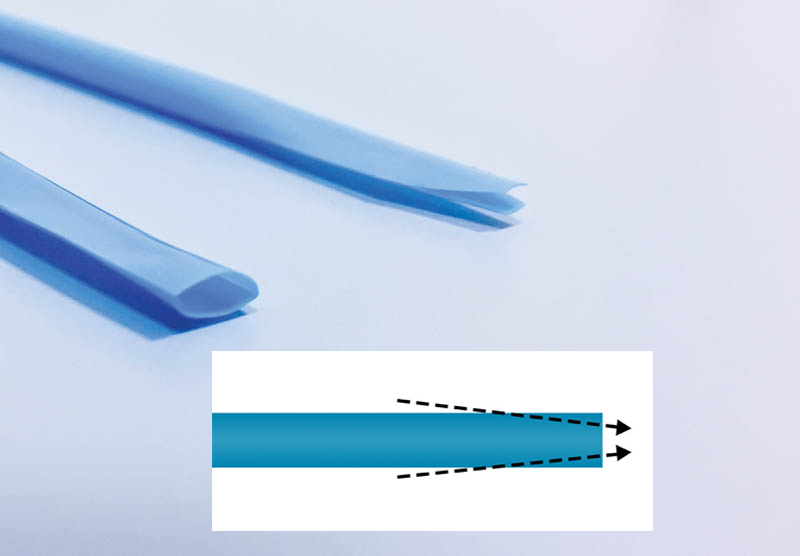
- Gently flatten the last 3–5 cm of a straw as seen in Figure 1. Cut the sides at an angle as shown in Figure 2.
- Gently blow through the cut end of the straw until a sound is heard. If you did it right, you'll hear a broad-band buzzing sound with lots of harmonics. This is the sound of the ends acting as a double reed, just like an oboe.
Before your outreach event, practice these two steps until you can make and play a straw oboe without a hitch. It’s helpful to bring a working example. - If time allows, have participants modify their instruments by attaching a second straw or cutting a small hole in the straw. Lengthening the straw will lower the pitch of your instrument, while adding holes will raise the pitch (unless it's covered by a finger) by effectively shortening the resonating tube.


PHYSICS:
The straw acts as a closed, cylindrical resonator with a sound generator at the end (the triangular end). The tube length defines the resonance frequency of the straw, while the triangular cut end acts as a double-reed sound generator, which makes sound at many frequencies. The frequencies produced by the double reed that match the resonance frequencies of the pipe resonate and become the sounds we clearly hear. The base frequency is related to the length of the straw through the generalized wave relationship: υ=ƒ λ Eq (1)
where υ is the wave speed, ƒ is the frequency of the wave, and λ is the wavelength. In this case, the speed of sound in air is ~340 m/s, and the audible range for humans is roughly 20 Hz–20 kHz. The effective length of the instrument defines the wavelength λ, which defines the base frequency we hear.
This straw has one end that is open to atmospheric pressure, while the end with the reeds acts as a closed end. Similar to an oboe, this straw will have resonant frequencies that are multiples of odd whole numbers, because the pressure boundary conditions demand that one pipe end must be a node while the other pipe end must be an antinode. The open end can allow air to move in and out (longitudinal air waves) but does not allow pressure variation because it is open to atmosphere. The triangular closed end (reeds) cannot allow air motion when the reeds are closed together but can allow air pressure oscillations. Several references have been published that explain the physics of this process in more detail and can be studied if you want to understand the acoustics at a deeper level, including why a straw has resonant frequencies.1-3
EXPLANATION:
Target your explanations to the age and experience level of the group you're working with. Younger children will understand that the V-shaped end acts as a reed because they can feel it vibrate. Note that the length of the tube adjusts the timbre, or frequencies of the sound produced. Have several straws of different lengths on hand to demonstrate this concept.
If working with older members of the public, spend some time explaining that either extending the straw or cutting small holes makes the straw effectively longer or shorter, causing lower or higher pitches.
If working with college students, work through a back-of-the-envelope calculation about what base pitch should come out of the straw for a given length.
COMMON QUESTIONS TO EXPECT:
Does the size of the hole affect the sound?
Very much so. Small holes effectively make the tube a little shorter, while a large hole will effectively make the hole the new end of the tube. Read more on this effect here.4
Why isn’t mine working?
It takes some practice and work to make a sound for the first time, as you need the triangular-shaped plastic ends to vibrate well. Bring extra straws so participants can try again!
Will this work with other materials?
Yes! It turns out that you could put a reed on almost any pipe and it will work in a similar way. This experiment is nice because you can make the reed and pipe as one unit very quickly. A cool demonstration is to hollow out a carrot and put the straw or actual reed in the end of the carrot to make a carrot-oboe (carroboe?)!
LEARN MORE:
https://www.spsnational.org/programs/outreach/strawreed
References
- N. H. Fletcher and T. D. Rossing, The Physics of Musical Instruments, 2nd ed (Springer Verlag, New York, NY, 1998), chapters 15-16.
- T. D. Rossing, F. R. Moore, and P. A. Wheeler, The Science of Sound, 3rd ed (Addison-Wesley, New York, NY, 2002), Chapters 3 and 12.
- N. H. Fletcher, Annual Review of Fluid Mechanics 11, 123-146 (1979).
- A. H. Benade, Fundamentals of Musical Instruments, 2nd ed. rev. (Dover, New York, NY, 1990), chapters 21-22.
